
If you are developing software, it’s highly likely that you heard about microservices. The main purpose here is to divide our projects into micro ones and to ensure that all of them work in a harmony. The reason for this is usually to both facilitate scaling and reduce maintenance and release costs by separating each service’s responsibility and dependency on others. We want to benefit from the privileges of microservices on a functional basis by designing our work to be done within a service as Single Responsibility, which is the first of the SOLID principles. So we can argue that breaking our work into small functions is a good thing in a way.
Apart from that, we need to evolve our codes into projects and publish these projects in order to make them available for use. There may be many working environments that we can publish, but Cloud systems are also rapidly increasing in popularity for this purpose. Here, even in Cloud systems, we can find the necessary infrastructure to easily publish and manage not only our projects but also the functions that we will use in our projects. In today’s article, we will examine how the “Azure Functions” on Microsoft’s cloud service Azure, make our lives easier.
Terminology;
Throughout this article, you will often hear the words listed below. In order to make the article more understandable, it is useful to explain these words at the beginning.
Azure; It is a Cloud Service released by Microsoft in 2010.
Resource; We will call each of the items that we have created in our cloud system a resource. Examples: Database, Network, Azure Function, ServiceBus, etc.
Azure Storage; We can think of it as a virtual hard disk produced to facilitate the storage of different types of data on the Azure side. We can keep our data as Table, Queue, Blob, or FileStorage. In this case, Azure Storages can be used to store data not only by us but also by our Resources (we will see for example).
Serverless; It’s a very special word. Because if you have not used Serverless before, it may be a little difficult to digest. Although the name suggests Serverless, perspective is important here. We generally use our servers to publish our projects on them, and in this case, all the maintenance, adjustments, and backups of the server and the project to be published are done by the user, that is, by us. In the Serverless scenario in Azure, of course, a server is needed for our project to work, but as a user, this is not our concern. We entrust our project to Azure, take care of the points we need to do/say if any, and throw the ball to the cloud system and sit back. All processes such as running this application on any server (we can choose the one we want), keeping it running, and server cost/maintenance are managed by Azure. Azure Functions will be used exactly like this for us 🙂
FaaS; is one of the abbreviations used to describe the types of services that Azure offers to us. Azure Functions will also be included under the “Function as a Service” category. But Functions isn’t the only service, of course.
Azure Functions; Since this subject will be the main subject of our article, we will go into the details shortly.
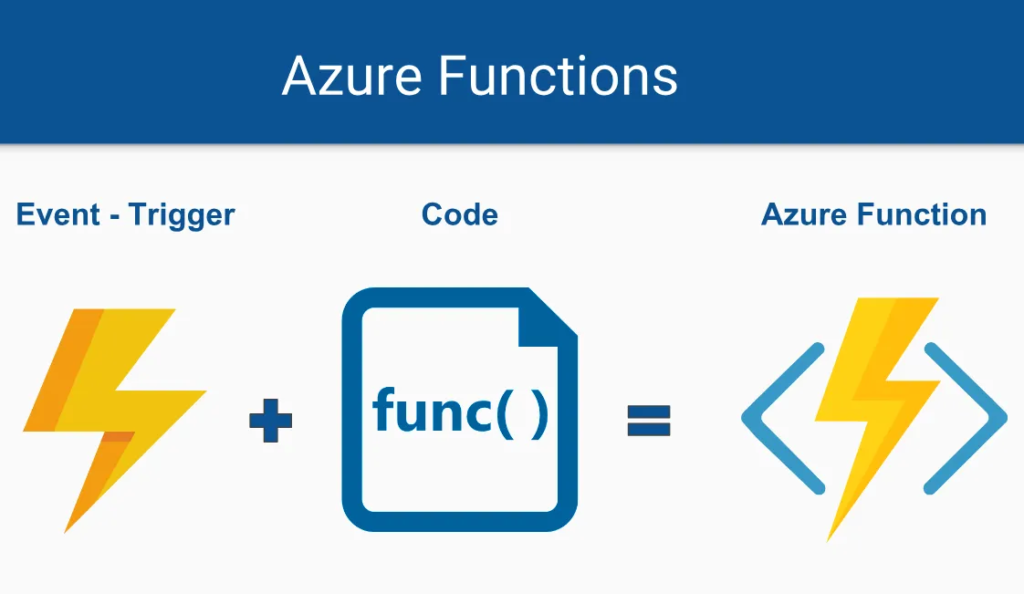
Triggers; The event that executes an Azure Function.
Binding; Integration of an Azure Function to produce input and output in our system.
Not: Concepts such as Azure Portal and Azure DevOps will not be explained within the scope of this article, because the topics are too big to be covered in a single article.
I know the intro is a little long, but hold on a little longer. The fun part starts now.
The first point we need to understand about Azure Functions is: The purpose of using Azure Functions is to create functions that serve a single purpose. Therefore, just like Single Responsibility, we assign one responsibility to a function. However, interrelated function sets can be contained in a single Azure Function project. (Although not recommended)
Another point we need to know is this; Just as the functions in our project must be called for them to work, the same is true for Azure Functions as well. So we create a function and also specify how or when it should run. (We’ll get into how that happens soon)
Now I’m going to tell you something that you must lose your mind when you heard. Are we ready yet? Azure Functions can work in integration with other Resources on Azure. I know you’re asking what’s wrong with this man but think about it this way. You have a database (a resource) on Azure, you have a ServiceBus, or you have a CosmosDb. By writing any Azure Function, working with and connecting to these resources can be achieved very, very easily, and also effectively with a single line of code. Isn’t it very good?
Before explaining the types of Azure Functions and when they are triggered, I would like to briefly talk about their pricing. The first thing we need to know about pricing is that Azure Functions works in a serverless structure, so we don’t pay for the entire server, we only pay for the server’s resources while our function is running (Consumption plan).
So let’s say we wrote and published a function but never used it. In this case, we don’t get any money out of our pockets. However, while talking about the serverless structure, I said that we are able to choose what kind of server our application will run on. Regarding this, there are basically 2 different server plans. Consumption and Premium Plan.
When we choose Consumption Plan, our function runs on a common server. Idle time is 20 minutes and if it is not used during this period, it goes into a sleep state and starts working again on the next trigger. When the application restarts (Cold Start), it may take a few seconds to start working.
In the Premium Plan, however, our application will remain running like a web application, so there will be no problems like Cold Start. However, its pricing is not calculated with the resource consumption of the function, it is calculated per hour as the application is running continuously.
As we said, we need a function to be triggered to work somehow. We will call these Azure Functions Triggers. When we say Azure Functions, we will divide the subject into two here. Triggers and Bindings.
Let’s start with triggers. An Azure Function can be triggered by the following methods;
HttpTrigger; It is used to run a function by triggering it over HTTP. You can think of it as an Action Method under controllers in your WebApi project. It can be run via the HTTP method over a URL.
TimerTrigger; We can use this type of function when we want a self-executing function in certain periods. According to the information here, TimerTrigger Azure Functions can be scheduled using the NCronTab Expression method.
CosmosDbTrigger; We can trigger an Azure Function after Insert and Update operations on CosmosDb, a NoSql product. Isn’t it perfect?
BlobTrigger; I mentioned Blob Storage in the Azure Storage section. We can write a function that is triggered by changes in this structure. Such as when a file is uploaded. For example, when an image file is uploaded through your website, you can trigger a function and resize this image.
ServiceBusTrigger; If you are using ServiceBus you can write a function that is triggered when a message arrives in a Queue or a Topic. For example; When a message is sent to queue X, you can write a function that can receive the message and send it as an email. Therefore, you integrate your mailings with a queue structure. In addition, triggering methods such as EventGridTrigger and EventHubsTrigger within Azure can be used. Even RabbitMQTrigger can be used for RabbitMQ that you have run on Azure.
Apart from these, there are also trigger methods such as KafkaTrigger, SignalRTrigger, and QueueStorageTrigger.
I mentioned the integrations we can do within the functions, and I said that we will call it Bindings. Bindings have something different from Triggers. While an Azure Function can be triggered only one way, it can have multiple Bindings. We will divide these Bindings into two inputs and outputs. These can be considered as getting or setting the data on the system. Now let’s examine the important ones of these Binding methods together.
In the list below, there is a list of which Bindings can be used with the versions of Azure Functions. You can access this list here.
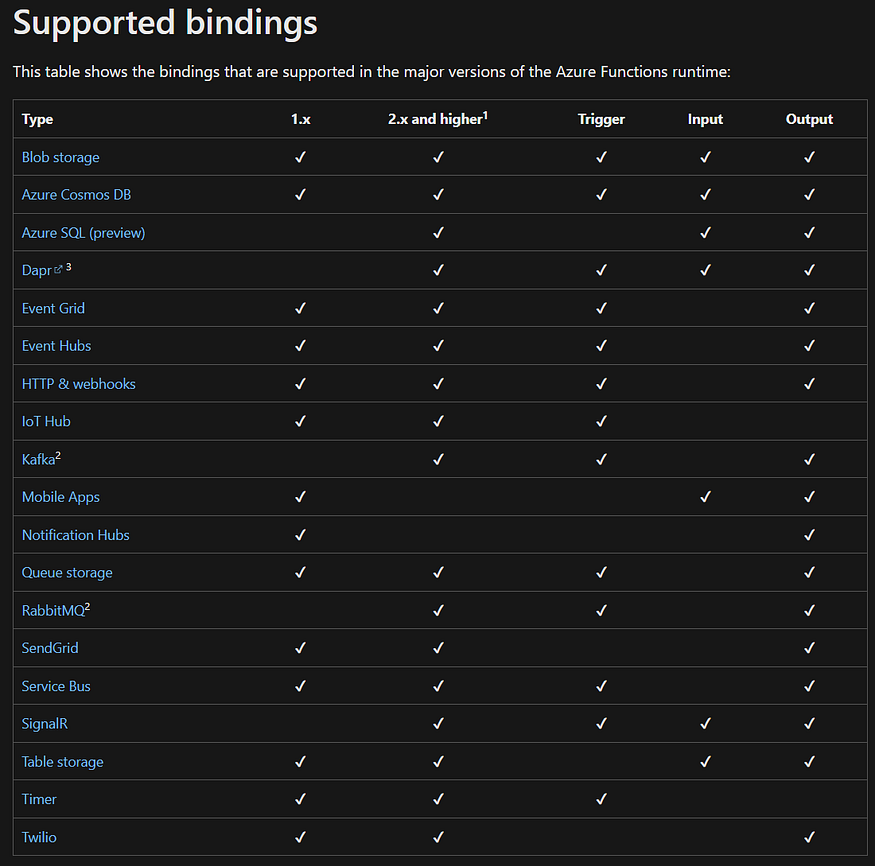
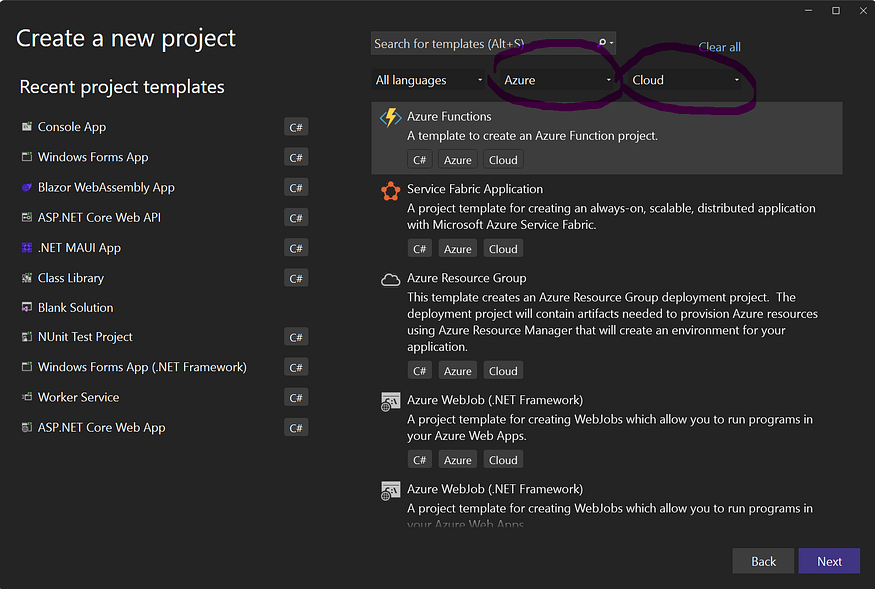
As you can see, the list is quite long. Unfortunately, we cannot go into details for all of them in this article. I want you to think about Bindings here. Let’s say we will use RabbitMQ Output Binding. This means that we will write data to RabbitMQ. Let this function be TimerTrigger. For example, this function, which runs every 2 hours, can regularly write data to RabbitMQ. There are many kinds of ways to use Bindings. We can choose the one we want according to how we will use it. We can even add our Custom Bindings into Azure Functions. Now let’s create an Azure Function that will run on our computer via Visual Studio 2022.
After choosing Create Project, let’s choose Azure Functions from the Categories.
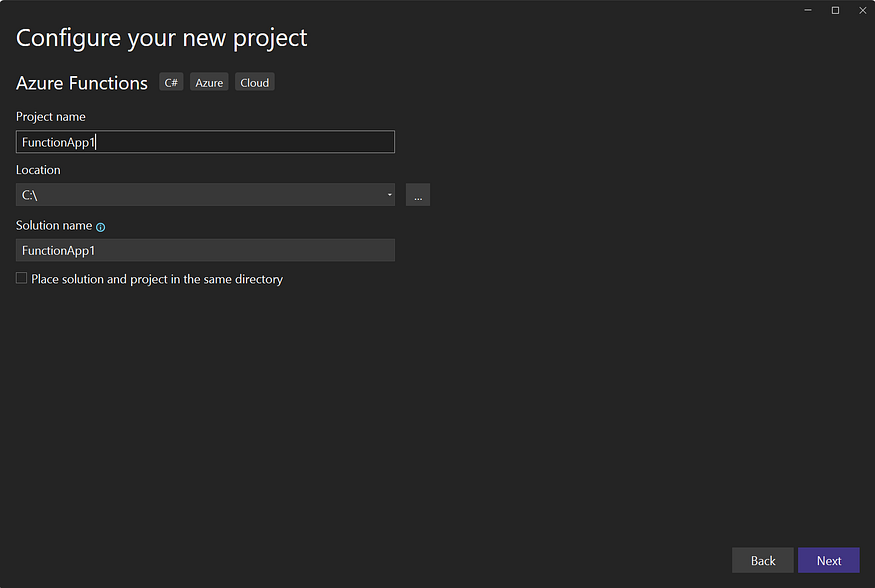
The next step is to choose the folder where the project will be saved and name the project.
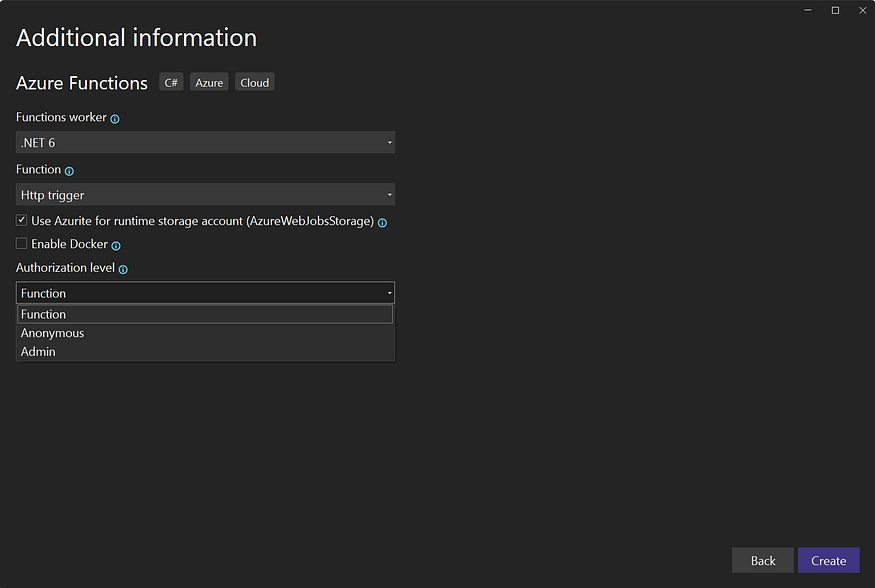
We will select the Trigger for the function we will create in the next step, and if the Trigger we selected requires extra information, we will see those fields at the bottom of the screen. For example, if there was a QueueTrigger, it would also ask us which Queue it would be. Here, we said that we are going to write a function HttpTrigger and it asks us to choose a type to access this function. We will choose Anonymous so that anyone with the URL can use it without any special authorization.
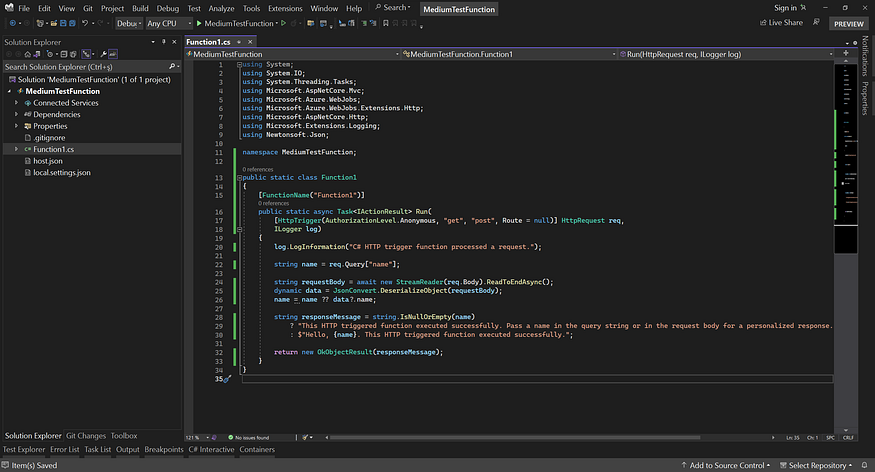
After Create button, our project is created and an image like the one below is created in Visual Studio. Since our Binding method is not specified, it is not included in the function template and we need to add it later.
The FunctionName attribute appears as the function name, the host.json file, the settings that can be gathered with the IConfiguration interface, and the local.settings.json file as the files that we can add the settings that we can use when debugging on your local computer.
Our purpose in this function will be to put the request coming with HttpTrigger to the relevant queue using ServiceBusBindings. Therefore, we make our method as follows.
First, let’s install the “Microsoft.Azure.WebJobs.Extensions.ServiceBus” package into our project.
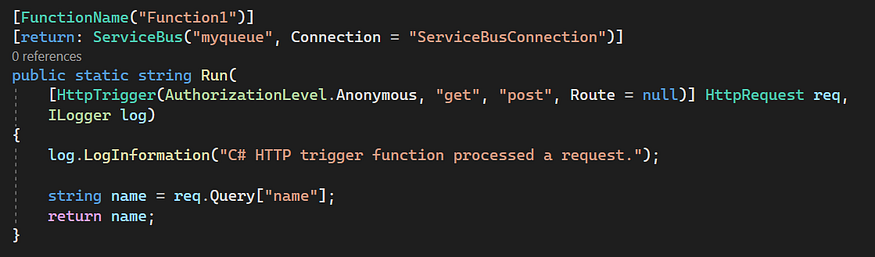
Here, we add the ServiceBus attribute and add the return to the beginning. We also edit our method to return a string. This means that this method returns the string value, and adds it to the “myqueue” queue in ServiceBus. However, this is not the only way to do it, it can be added as a parameter in our ServiceBus function and used. His example could be as follows.

In this function, we added a parameter for ServiceBus Binding. The parameter that we have defined as IAsyncCollector<dynamic> will mean ServiceBus for us. The meaning of this value is when we call the AddAsync method, add the variable name to the myqueue queue in ServiceBus! Isn’t it easy and very impressive? This was an example of Output Binding, but we could also do this using Input Binding. For example, we can take a JSON value that comes to us from a function using QueueTrigger as a Model, and call the relevant data from CosmosDB according to the Property of the model we get from this Queue by using CosmosDb Input Binding. For that, you will have to write a function like this.

As you can see, we can directly receive the data in the myqueue queue as a ToDoItem class. And again, using the Id and PartValue values from this model, we can bring the data from the database with the CosmosDb Input Binding method. Very easy and nice method 🙂
We have come to the end of this article. There are too many Bindings and Triggers in the Azure Functions world. I’m sorry we can’t go into the codes and details about all of them in this article, but I will start making videos about Azure on my Youtube Channel. If you want to watch the videos, I welcome you all to the channel. (In the Turkish Language)
Hope to see you in other articles. Stay with Azure…:)
